Guide to Sourdough: Your First Perfect Loaf Made Easy
Guide to Sourdough
Oh, friends, if the thought of diving into the magical, sometimes mysterious, world of Guide to Sourdough has felt like scaling Mount Everest, then consider this your friendly base camp! I vividly remember my own first attempts – a sticky, bewildering mess that felt less like a cozy kitchen adventure and more like a science experiment gone spectacularly wrong. There were deflated dreams (and loaves!), questionable smells emanating from my starter jar, and a fair bit of flour splattered in places flour really shouldn’t be, trust me.
Thank you for reading this post, don't forget to subscribe!But then, something truly clicked. It was like finally understanding a secret language; I found my rhythm, learned to listen to the subtle whispers of my bubbly starter, and oh, the pure, unadulterated joy of pulling that first perfectly crusty, impossibly airy loaf from the oven! It wasn’t just bread; it felt like a true kitchen victory, a badge of honor for every home cook who dared to embark on this journey.
This comprehensive Beginner’s guide to sourdough isn’t just about following ingredients and steps; it’s about sharing the real talk, the little family secrets, and the practical tips I picked up along the way to ensure your sourdough journey is filled with far more triumphs than ‘fails.’ We’ll cover everything from feeding your starter to shaping your dough, and even explore what to do with extra starter, like making a wonderfully easy sourdough discard bread or whipping up some truly delicious sourdough pancakes for breakfast. So, let’s get our hands floury and bake some magic together – your kitchen (and taste buds!) will thank you!
Guide to Sourdough: Your First Perfect Loaf Made Easy
Course: GuidesCuisine: European, AmericanDifficulty: Medium4
servings30
minutes40
minutes300
kcalDemystify sourdough with this comprehensive, beginner-friendly guide covering everything from creating your first vibrant starter to baking your most satisfying, rustic loaf right in your own kitchen.
Ingredients
For the Sourdough Starter:
• 50g whole wheat flour (organic, unbleached)
• 50g unbleached all-purpose flour
• 100g filtered water (chlorine-free)
• Additional flour and water for daily feedings
For the Sourdough Loaf (Once Starter is Active):
• 100g active sourdough starter (fed and bubbly)
• 350g filtered water
• 500g unbleached bread flour
• 10g fine sea salt
Directions
- Part 1: Creating Your Sourdough Starter (‘Audrey’)
- Day 1: In a large glass jar, combine 50g whole wheat flour, 50g all-purpose flour, and 100g filtered water. Mix well with a spoon until no dry spots remain. Cover loosely with a lid or cloth and let sit at room temperature (ideally 70-75°F / 21-24°C) for 24 hours. Give it a good name – mine is Audrey!
- Day 2-7 (or until active): Discard all but 50g of your starter. Feed the remaining 50g with 50g all-purpose flour and 50g filtered water. Mix well. Repeat this feeding process every 24 hours. You should start seeing bubbles and a sweet, yeasty smell by Day 5-7. It’s active when it consistently doubles in size 4-8 hours after feeding.
- Part 2: Baking Your First Sourdough Loaf
- 1. The Autolyse (Morning): In a large ceramic bowl, combine 350g filtered water and 500g bread flour. Mix until just combined and no dry flour remains. Cover the bowl and let it rest for 30-60 minutes at room temperature. This helps the flour hydrate and gluten develop.
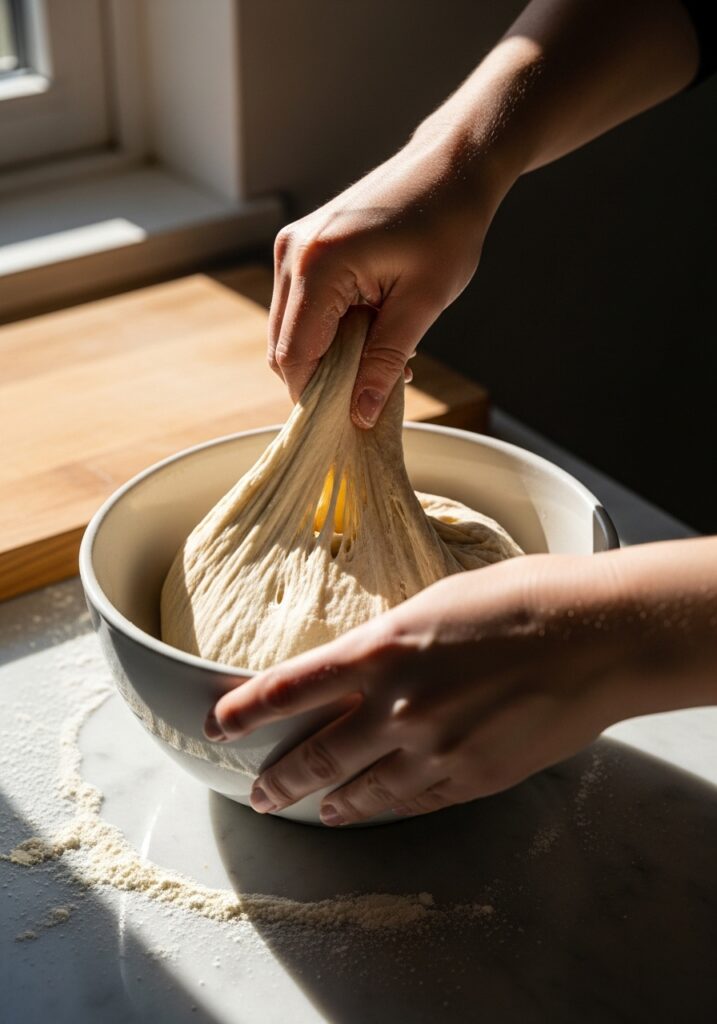
- 2. Mixing (After Autolyse): Add 100g active sourdough starter and 10g sea salt to the dough. Using your hands, mix thoroughly for 2-3 minutes, squeezing and folding until the salt is fully incorporated and the dough feels slightly smoother. Cover and let rest for 30 minutes.
- 3. Bulk Fermentation (Folding Time, 4-6 hours): Over the next 4-6 hours, perform a series of ‘stretch and folds’ every 30-60 minutes. To do this, wet your hand, grab a portion of the dough, stretch it upwards, and fold it over itself. Rotate the bowl and repeat 3-4 times. Cover the bowl each time. The dough should become noticeably stronger, gassier, and almost double in size.
- 4. Preshape (After Bulk Fermentation): Gently scrape the dough onto a lightly floured wooden cutting board. Gently shape it into a round using a bench scraper and light flour. Let it rest, uncovered, for 20-30 minutes.
- 5. Final Shape (After Preshape): Lightly flour your banneton (proofing basket) or a bowl lined with a floured towel. Gently reshape the dough into a taut round or oval. Place it seam-side up into the banneton. Cover with a plastic bag or shower cap and refrigerate for 12-18 hours (cold proof).
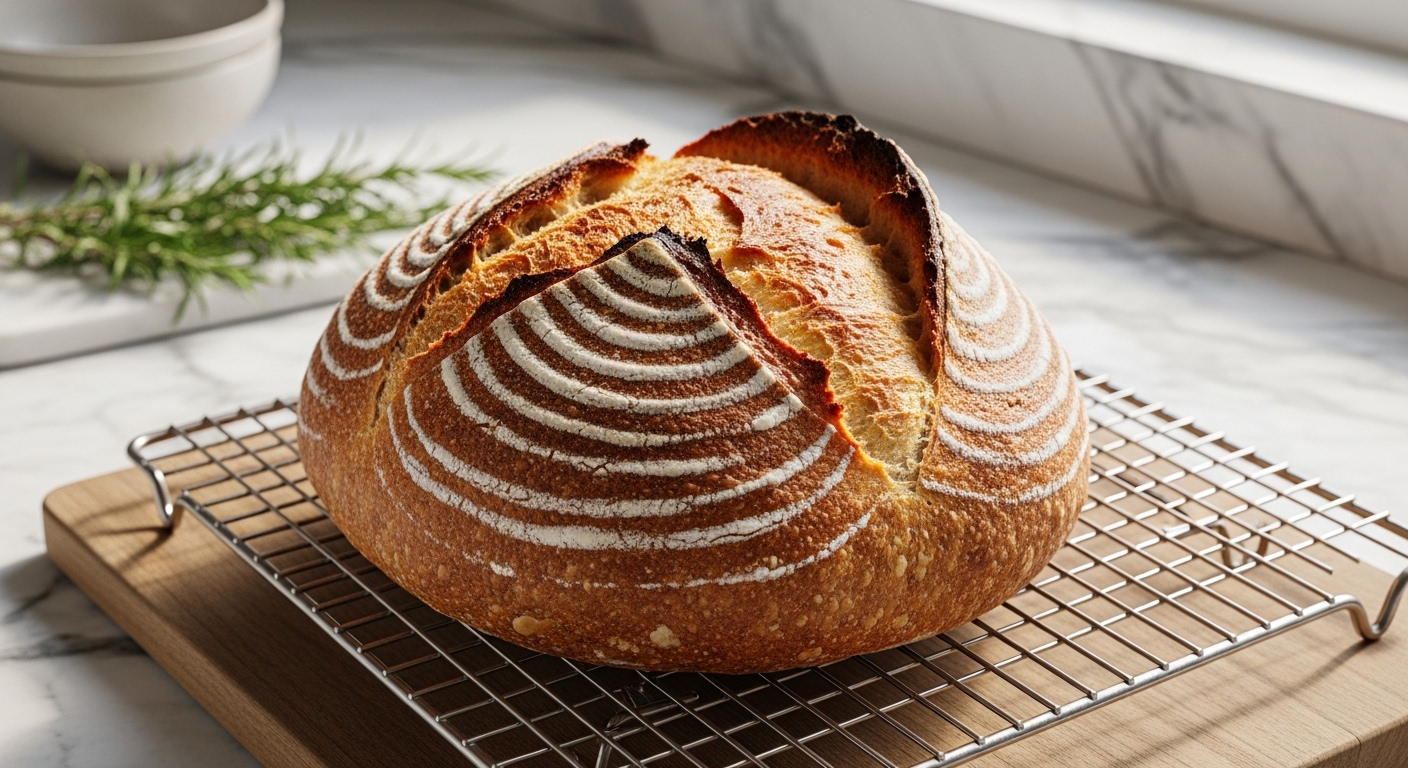
- 6. Bake Day (Morning): Preheat your Dutch oven in your oven at 475°F (245°C) for at least 30 minutes. Carefully remove the hot Dutch oven. Gently invert the cold dough from the banneton onto parchment paper. Score the top of the dough with a sharp razor or knife.
- 7. Bake (Covered): Carefully transfer the dough on the parchment paper into the hot Dutch oven. Cover with the lid and bake for 20 minutes.
- 8. Bake (Uncovered): Remove the lid, reduce the oven temperature to 450°F (230°C), and continue baking for another 25-35 minutes, or until the crust is a deep golden brown and the internal temperature reaches 200-210°F (93-99°C).
- 9. Cool: Carefully remove the loaf from the Dutch oven and place it on a wire rack to cool completely for at least 1-2 hours before slicing. This is the hardest part, but crucial for the crumb!
Notes
- Audrey’s Happy Place: Your sourdough starter, Audrey, thrives in warmth and consistency! Find a cozy spot in your kitchen away from drafts. If your kitchen is cool, a turned-off oven with the light on can be a perfect proofing box for both your starter and dough.
- The Crumb Whisperer: Don’t fret if your first loaf isn’t a showstopper. Practice makes perfect! Pay attention to how your dough feels during the bulk fermentation – it should be airy and jiggly. And that cooling step? Non-negotiable! Slicing too early can make your beautiful crumb gummy.
- Beyond the Loaf: Once your starter is active, it’s not just for bread! Keep it fed in the fridge and use the discard for pancakes, crackers, or even cookies. It’s a fantastic way to enjoy that sourdough tang in other recipes and minimize waste!